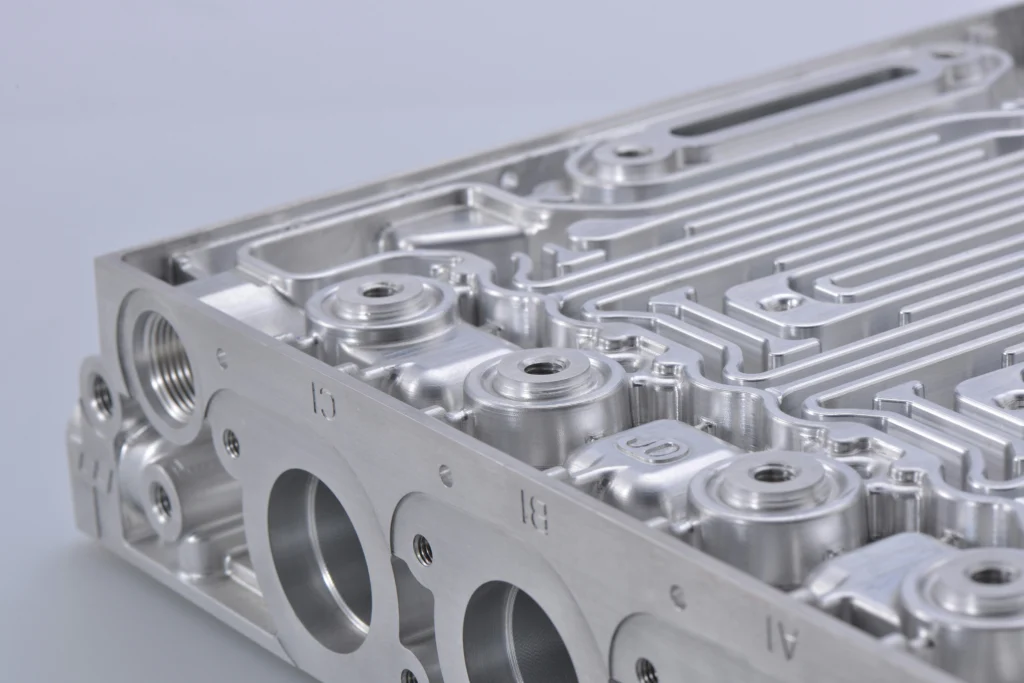
Thin-walled bodies, rings, slimmed-down housings – all these elements look inconspicuous, but technologically they can be a real challenge even for experienced contractors.
Where a solid element remains stable, a thin wall begins to act like a membrane – it reacts with vibrations, deflection, and deformation when removed from its mounting.
That is why CNC machining of thin-walled parts requires a completely different approach than standard milling or turning.
Based on our more than 45 years of experience in CNC machining, we discuss the most important challenges associated with such geometries and practical methods for reducing vibrations and deformations – from machining strategies and tool selection to proper fixture preparation. We invite you to read on.
Table of contents
Thin-walled parts – what does this mean in practice?
In workshop practice, thin-walled elements are not assessed solely on the basis of their nominal wall thickness.
Much more important is the ratio of wall height to wall thickness (H:T), which determines the stiffness and how the part will behave under cutting load. The higher this ratio, the greater the susceptibility to deformation.
This is most easily seen in the behavior during machining:
- With walls with a low H:T ratio, cutting forces cause slight deflections,
- while with thin and high walls, even moderate cutting forces can lead to deflections and vibrations.
Thin-walled parts are typical in industries where designers strive to reduce weight: aerospace, energy, machinery, and automotive.
Relieving the load on components reduces material wear and dynamic loads, but at the same time requires the machining technology to be able to ensure adequate rigidity and accuracy on components that are inherently flexible.
This is why CNC machining of thin-walled components is a process carried out on components that are not designed to be rigid – and this is the main technological challenge.
Where exactly do vibrations and deformations come from?
In thin-walled components, it is not only low rigidity that is decisive, but also the way the material reacts to variable loads during cutting. In practice, three phenomena overlap, which can completely change the behavior of the part during machining.
- Vibrations (chatter) – the cutting force causes the wall to vibrate.
- This can be seen as a characteristic high-pitched tone and a wavy surface structure. This is not just a matter of aesthetics – vibrations lead to reduced surface quality, accelerated tool wear, and an increased risk of microcracks.
- Wall deflection under load – during milling or turning, the tool causes the thin wall to deflect.
- In practice, cutting is not performed according to the nominal geometry, but according to the position resulting from the momentary deflection. This results in non-uniform wall thickness, local conicity, and disturbed surface parallelism.
- Deformation after removal from the fixture – when the support from the fixture ceases, the material returns to equilibrium and the workpiece may change shape.
- When the fixture is released, the internal stresses are released and the component can deform like a spring. Often, only a measurement after removal from the fixture shows the actual shape of the workpiece.
If we add to this the stresses generated during rough machining, the influence of temperature, and the limitations resulting from clamping, it is easy to understand why thin-walled components are so susceptible to geometric changes.
Clamping – the foundation of CNC machining of thin-walled components
Without the right tooling, even the best cutting parameters will not ensure a stable process. Thin-walled parts require full, even support – point clamps or grips in a single location can cause more deformation than the machining itself.
Typical approaches to clamping include:
- supporting the entire height of the wall on precisely fitted surfaces of the fixture,
- using additional ribs, bridges, or “sacrificial material” that stiffen the part during machining and are removed in the final operation,
- minimizing clamping force—clamping must not deform the wall more than the machining itself.
Added to this is the issue of the tool — shortening the reach, using rigid holders, and eliminating backlash. The entire “fixture + holder + tool” system must work as a single, rigid block.
Cutting strategies – lighter, more frequent, with control over allowances
When CNC machining thin-walled parts, aggressive, deep passes almost always lead to vibrations and loss of geometry.
An approach based on controlled, multi-stage machining with limited wall loading gives significantly better results.
In practice, it is worth using:
- Layered wall machining, so as to always leave as much support as possible – first the higher parts, then the lower sections.
- Alternating machining, which balances stresses and reduces one-sided deviations.
- Reducing the cutting width and depth as the wall becomes increasingly slender.
- HSM/HEM strategies, which ensure a constant tool load and avoid sudden changes in cutting force.
The goal is not to “remove material” quickly, but to consistently control deformation at every stage.
Cutting parameters and tools – how to reduce cutting forces?
In thin-walled components, it is crucial to limit lateral forces that directly cause deflection. This can be achieved on several levels:
Cutting parameters
Instead of one deep pass, several shallower passes with a smaller cutting width are used. In some cases, it is better to work at higher speeds with a smaller feed per tooth to avoid areas of instability.
Tool geometry
Sharp tools with a positive rake angle (“soft cutting”) generate less force than geometries designed for aggressive cutting. Milling cutters with variable tooth spacing or anti-chatter geometry help to dampen vibrations.
Tool holders
Hydraulic, heat-shrink, and vibration damping systems can dramatically improve stability at longer reaches. In practice, they are often a more cost-effective choice than lengthy attempts to stabilize the process with a standard holder.
Summary – 5 rules for CNC machining of thin-walled parts
For clarity, we have compiled the most important conclusions in a short checklist:
- Use full, stable wall support – the fixture determines the success of the process.
- Choose light, multiple, layered passes instead of aggressive stripping.
- Machine the walls alternately and leave controlled allowances.
- Use sharp tools with “soft” geometry and vibration-damping holders.
- Plan the process so that thin walls are created as late as possible and are controlled under conditions similar to those of the workpiece.
In many cases, a certain level of deformation after release of the clamping is unavoidable. It is crucial to anticipate this phenomenon and take it into account in the machining plan, rather than correcting errors only in the final inspection.